Kids' Handheld Microscope Guide — How to Use a 60X–120X Pocket Microscope with Your Children

The 60X–120X handheld pocket microscope is a lightweight, battery-powered mini microscope that pulls small, everyday details into view for parents and kids. This guide walks you through safe setup and use, simple indoor and outdoor activities, and quick ways to turn short observations into meaningful STEM learning that matches primary-school inquiry skills. We keep jargon to a minimum and focus on practical steps: clear setup instructions, troubleshooting tips, age-appropriate experiment blocks, and easy record-keeping ideas to grow curiosity and observation skills. You’ll also find links to the Australian Curriculum and a short maintenance checklist so the microscope stays ready for regular use. Read on for step-by-step how-tos, specimen-specific experiment plans, curriculum connections and care routines to help you make the most of your 60X–120X pocket microscope with children.
What Is a 60X–120X Handheld Pocket Microscope and How Does It Work?
A 60X–120X handheld pocket microscope is a small, portable optical tool that magnifies objects 60 to 120 times so children can see textures, crystals and tiny structures invisible to the naked eye. It combines an eyepiece and objective lens with a focus wheel and a zoom wheel to change magnification and sharpen the view. An LED light keeps samples bright even in low light. The unit runs on AAA batteries stored in a simple compartment and is usually made from ABS plastic for light, child-friendly handling. Knowing these parts helps you supervise safely and troubleshoot common issues like dim lighting or soft-focus images — both of which we cover in the setup and maintenance sections below.
This quick reference table sums up the key specifications and features so you can scan what matters before you start exploring.
| Specification | Attribute | Typical Value |
|---|---|---|
| Magnification | Range | 60X–120X |
| Power | Power source | AAA battery (replaceable) |
| Key features | Components | LED light, focus wheel, zoom wheel, eyepiece, lens |
| Build | Material | ABS plastic (lightweight, handheld) |
This table clarifies what to expect from the pocket microscope and points you to the specific controls you’ll use when setting up and focusing. Familiarity with these parts makes handling safer and exploration more effective with children.
What Are the Key Parts and Features of the Pocket Microscope?
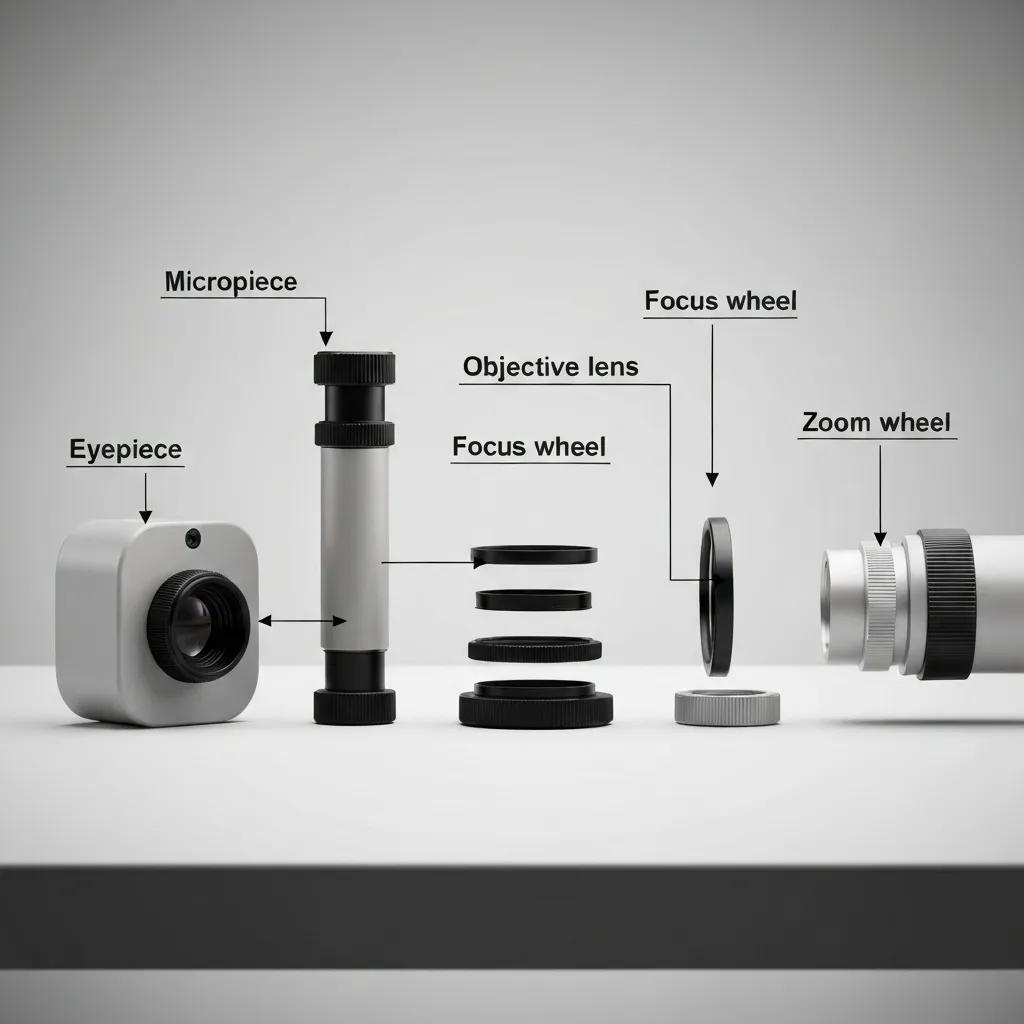
The main parts of the 60X–120X handheld pocket microscope are the eyepiece for viewing, the objective lens for magnification, a focus wheel to sharpen the image and a zoom wheel to switch between 60X and 120X. An LED light illuminates the specimen (from above or below depending on the model), and a battery compartment holds AAA batteries. Getting to know these parts reduces frustration: the focus wheel fine-tunes clarity, the zoom wheel changes how much detail you see, and the eyepiece is where a child places their eye or where you can line up a phone camera for photos. Using the correct names also makes troubleshooting easier when you face flickering LEDs or a loose eyepiece.
Handle the wheels gently to avoid stripped gears, and use a soft surface under delicate samples to keep them steady — good habits that feed directly into the step-by-step setup below.
Why Is This Microscope Ideal for Children and Young Scientists?
This pocket microscope suits children because it pairs useful magnification (60X–120X) with portability and simple controls. Its ABS plastic shell keeps the weight down and lowers breakage risk, while the focus and zoom wheels plus an LED let kids get instant visual feedback with minimal help. The handheld design is perfect for outdoor exploration and short, curiosity-driven sessions—quick wins that keep kids engaged and eager to repeat experiments. Supervision needs vary by age: younger children benefit from guided observation, while older primary students can take measurements and keep independent records, which ties into the STEM skill-building sections later on.
Its practical mix of robustness and simplicity makes this pocket microscope a great learning tool and a natural entry point to structured, curriculum-aligned activities.
How Do You Set Up and Use the Pocket Microscope Step-by-Step?
Preparing the pocket microscope is quick and gives reliable results: unbox carefully, insert AAA batteries with correct polarity, switch on the LED, place a stable sample, start at the lowest magnification and focus with slow, steady turns of the focus wheel. The numbered list below is a dependable quick-reference you can follow each time you and your child want to investigate. After setup we cover focusing and zooming techniques plus a checklist of supplies to make sessions smooth and repeatable.
- Unbox and check the device for shipping debris or loose parts before first use.
- Open the battery compartment, insert fresh AAA batteries observing the polarity marks, then close it securely.
- Turn on the LED and check brightness — if it’s dim, reseat or replace the batteries.
- Place the specimen on a flat, stable surface or clear slide and position the microscope above it, starting at the lowest zoom.
- Slowly turn the focus wheel until the image sharpens, then increase magnification with the zoom wheel as needed.
This straightforward routine gives parents a repeatable start that leads straight into experiments and observation practice.
How to Insert Batteries and Turn On the LED Light?
Find the battery compartment (usually on the underside), slide off the cover and insert AAA batteries following the orientation marks. Close the compartment and switch on the LED with the power slider or button. The LED should give bright, cool light for most samples — save battery life by turning it off between sessions. If the LED won’t light, reopen the compartment to check the contacts for corrosion or misalignment and try fresh batteries; weak cells often cause dim or flickering LEDs. For long storage, remove batteries to prevent leakage and protect the plastic body and internal contacts.
Good battery habits keep the microscope ready and link directly to the focusing tips that reveal fine structure.
How Do You Focus and Adjust Zoom for Clear Viewing?
Always begin at the lowest magnification (60X). Centre the specimen under the eyepiece and turn the focus wheel slowly until the image comes into focus — sudden movements can overshoot the focal plane. Once the low-mag view is clear, use the zoom wheel to increase magnification toward 120X and make small focus-wheel adjustments; at higher magnifications, tiny changes matter more. Stabilise small samples with a strip of clear tape on a slide or use a shallow dish for pond water, and work on a steady table to reduce hand-shake. If the image stays blurry after these steps, check the lens for dust and the LED for brightness — a gentle lens clean and fresh batteries usually fix persistent softness.
Practising this routine a few times builds confidence and sets children up for systematic experiments that strengthen observation skills.
After you’ve run through setup and focusing, try a short hands-on session with your child to reinforce the steps. A few quick practices turn setup competence into confidence and open the door to the experiments below.
What Are Some Fun and Easy Pocket Microscope Experiments for Kids?
Pocket microscope experiments are fast to set up, packed with observations and great for building STEM habits: ask questions, observe carefully and record results. The experiments below are easy to prepare at home or in the neighbourhood, stress safety and ethical collecting, and include “what to look for” notes so children know what to expect. Each block lists materials and step-by-step actions, plus a short learning takeaway to highlight the STEM outcome.
The table that follows summarises specimen-specific materials and common observations to help you plan several short sessions.
Try these four simple experiments with your 60X–120X pocket microscope:
- Look at a leaf surface for veins, texture and stomata — start with a whole leaf, then inspect torn edges or thin sections.
- Compare fabric threads from a sock or t-shirt to see weave patterns and loose fibres; stabilise samples with tape on a slide.
- Examine sugar and salt crystals on black paper and note differences in shape and how their facets reflect the LED.
- Place a drop of pond water in a shallow dish and search for micro-critters — use a clear plastic cover to steady the drop.
These experiments are low-barrier and scale easily: ask older children to sketch, measure or time observations to build record-keeping skills.
| Specimen | Materials Needed | What You Might See / Observation Notes |
|---|---|---|
| Leaf | Fresh leaf, clear tape or thin section | Veins, surface texture, stomata under magnification; colour patterns in the epidermis |
| Fabric | Small fabric swatch, tape or slide | Individual threads, weave patterns, frayed edges and fibre types |
| Crystals | Table salt or sugar, black paper or slide | Distinct shapes: cubic salt crystals, elongated sugar crystals; reflective facets |
| Pond water | Small jar, shallow dish, pipette | Tiny swimming organisms, debris particles, air bubbles and motile life |
Use this table to pick experiments that fit your time and materials — each session can be short, focused and rewarding.
Which Indoor Objects Can Children Explore Microscopically?
Indoor items are predictable, safe and easy to stabilise, so they’re perfect for first sessions. Try fabric threads from clothing, dust lifted on tape, salt and sugar crystals, human hair, or paper fibres — each shows different textures under magnification. Prep is simple: press tape to lift fibres, place a single hair on a dark background, or put a grain of sugar on black paper to see facets under the LED. Safety note: avoid biological samples like blood or other bodily fluids, and supervise any use of small parts or sharp edges with younger children.
What Outdoor Nature Items Are Perfect for Microscope Observation?
Great outdoor specimens include leaf surfaces, flower petals, insect wings (observe without harming the insect), soil and sand grains, and a drop of pond water. These often reveal structures tied to ecology and materials science. Collect ethically: observe living creatures in place or only briefly under supervision, and return them to their habitat. Use a shallow container or clear slide for wet samples, press tape on a leaf underside to lift tiny hairs and stomata, and compare sand grains to see mineral shapes and colours. Gentle, respectful collecting turns a nature walk into a micro-adventure that builds curiosity and conservation-minded behaviour.
Observing gently helps children connect what they see to real-world ecosystems and materials.
How Does Using a Pocket Microscope Support STEM Learning for Children?
A pocket microscope builds STEM skills by strengthening observation, inquiry, measurement and recording through hands-on, repeatable activities that encourage evidence-based thinking. Each session lets children ask a question, make a prediction, collect visual data via sketches or photos, and reflect on results — core aspects of scientific inquiry in the Australian Curriculum. By linking simple experiments to skills (for example, comparing fabric weaves to practise comparative analysis or timing micro-critters to introduce measurement), parents can scaffold learning and support classroom goals. Below are clear skill mappings and short activity ideas to help turn curiosity into structured, measurable learning.
This section maps microscope activities to practical STEM skills and offers quick, home-ready tasks parents can use to reinforce inquiry learning.
What STEM Skills Do Kids Develop with Microscope Activities?
Microscope sessions build careful observation, hypothesis-making and testing, data recording and comparative analysis. To sharpen observation, ask children to describe textures, colours and movement in full sentences or drawings to improve descriptive language and attention to detail. For hypothesis and testing, prompt predictions like “I think pond water will have more moving creatures than tap water” and compare samples to encourage experimental thinking. For recording, use simple tables or drawing logs where children note date, specimen, magnification and three observations — a habit that mirrors classroom science methods and reinforces measurement and documentation.
These skills prepare children for formal science tasks at school and promote a curious, evidence-based mindset.
How Does Microscope Use Encourage Curiosity and Scientific Thinking?
Microscope work sparks “I wonder…” questions and quick testing cycles where children change a variable — magnification or sample prep — and see the result immediately. Use prompts like “What do you notice now compared to before?” or “How could we test whether one fabric sheds more than another?” to move children from passive looking to active inquiry and simple experimental design. Celebrate discoveries and keep a learning journal to build reflective practice; small challenges (for example, find three different textures on one leaf) focus attention and encourage deeper observations. These habits of asking, predicting, testing and reflecting are the foundation of scientific thinking and help sustain interest in STEM.
Regular practice builds the thinking skills students need for success in primary science and beyond, and links directly to the curriculum mapping below.
How Does Using a Pocket Microscope Align with the Australian Curriculum?
Microscope activities align with the Australian Curriculum’s focus on science inquiry skills — questioning, planning, conducting investigations, observing, recording and reflecting — and connect to topics in living things and materials. The microscope provides concrete tasks for demonstrating inquiry skills across year levels, and parents can scale complexity to match classroom expectations. Below are explicit links between common microscope activities and curriculum inquiry skills, plus suggestions for sharing learning outcomes with teachers or noting them in a home learning journal. These mappings help ensure home investigations support classroom learning.
Clear curriculum alignment helps parents pick activities that reinforce school goals and develop transferable scientific abilities.
Which Science Inquiry Skills Does the Microscope Help Develop?
The pocket microscope helps children practise observing carefully (describe what you see), questioning (form testable questions), predicting (write simple hypotheses) and recording (drawings, short tables). For example, Year 2 students can note three observations about leaf texture and compare two leaves, while Year 5 students might measure magnification effects and log differences across several samples. Asking children to write a one-sentence conclusion after each session encourages reflection and ties directly to curriculum expectations for communicating scientific ideas. These hands-on tasks make home investigations useful complements to classroom work.
Scalable activities let parents match tasks to their child’s year level and learning goals effectively.
How Can Parents Connect Microscope Activities to Primary School Science Topics?
Parents can link microscope work to common primary topics: living things (leaf structure, insect observation), materials and their properties (fabric fibres, crystals), and earth science basics (sand grain comparisons). Share short observation logs or photos with teachers using a simple template: Date | Activity | Question | Observation | Conclusion. For younger children use pictures; for older students add magnification, measurements and brief interpretations to mirror classroom reporting. These home–school connections support continuity of learning and give teachers evidence that home investigations are reinforcing classroom objectives.
Using concise templates makes it easy to communicate learning clearly and shows teachers how home activities support curriculum aims.
What Are the Best Safety and Care Tips for Parents Using the Microscope with Children?
Safe handling, routine cleaning, correct battery care and sensible storage keep the pocket microscope reliable and child-safe while extending its life. Supervise younger children because small parts and AAA batteries can be an ingestion risk, and guide any collecting of live samples like pond water or insects. Clean lenses with a soft, lint-free cloth and check battery contacts to prevent damage; remove batteries for long-term storage to avoid leakage. The table below gives a simple maintenance checklist with recommended timing and reasons so busy parents can keep the device in good working order.
| Maintenance Action | Recommended Frequency | Rationale / Safety Note |
|---|---|---|
| Clean lens with soft cloth | After each session | Prevents scratches and keeps images clear |
| Check/replace AAA batteries | Monthly or before long sessions | Ensures bright LED light and avoids mid-session failures |
| Remove batteries for storage | For storage over 2 weeks | Prevents battery leakage and internal corrosion |
| Store in padded case | After each use | Protects mechanical parts and maintains alignment |
Following this checklist reduces disruptions during experiments and helps the microscope last through many learning sessions.
How Should Parents Supervise and Guide Children During Microscope Use?
Set simple rules: supervise children under 8, keep AAA batteries and small parts out of reach of very young kids, and model careful handling when turning focus and zoom wheels. Give short prompts to guide inquiry, such as “Name three things you notice” or “What would you change to make the image clearer?” which encourage observation and reflection. For live specimens, show how to observe without harm — use a shallow dish for pond water and return creatures to their habitat quickly. These routines protect children and deepen learning by keeping sessions focused and question-led.
Consistent adult guidance turns casual looking into structured learning and leads naturally into cleaning and maintenance habits.
How Do You Clean, Store, and Maintain the Pocket Microscope Properly?
To clean lenses, gently breathe on them to loosen dust, then use a soft, lint-free cloth or lens brush in circular motions — avoid solvents that can harm coatings. Wipe the plastic body with a slightly damp cloth and dry thoroughly. Check AAA battery contacts for corrosion when replacing batteries, and always follow polarity marks. If you’ll store the device for more than two weeks, remove batteries to prevent leakage. Keep the microscope in a padded case away from direct sunlight and extreme temperatures to protect plastic and internal parts. If mechanical parts stick or the LED still fails after fresh batteries and clean contacts, stop using it and seek professional repair rather than forcing components.
Routine care preserves image quality and keeps the microscope a safe, engaging tool for ongoing STEM exploration.
This maintenance guidance completes the practical steps that make microscope sessions productive and safe, helping families add short investigations to their regular learning routine.
The Use of Digital Microscopes in Science Education for Young Schoolchildren
ABSTRACT: Also titled "The Application of Digital Microscopes for Developing Concepts in Young Schoolchildren about Plants, Animals, and Fungi." Gabdulimova, Kamilya G; Kovrova, Maria A. Information Technologies and Learning Tools; Kyiv. Vol. 86, Iss. 6, (2021): 19–29. DOI: 10.33407/itlt.v86i6.4320 The use of a digital microscope for the development of young schoolchildren's ideas about plants, animals and fungi, 2021
Frequently Asked Questions
What age is appropriate for children to start using a handheld microscope?
Children can begin using a handheld microscope from about 5 years old with adult supervision. At that age they can explore simple specimens and follow guided observations. Between about 8 and 10 years, many children are ready for more complex tasks like running small experiments and keeping their own records. Always judge by your child’s maturity and interest, and keep activities safe, short and fun.
How can parents encourage scientific inquiry during microscope sessions?
Encourage inquiry by asking open-ended questions that get children describing and thinking: “What do you notice about the leaf’s texture?” or “How does this fabric look up close?” Prompt predictions before observing and discuss results afterward. Keeping a simple observation journal helps children track discoveries and builds a habit of reflection.
What are some common troubleshooting tips for using the microscope?
If the image is blurry, check that the specimen is stable and clean, then adjust the focus wheel slowly. If the LED is dim, confirm battery orientation and try fresh batteries. Turn the zoom wheel gently to avoid damaging gears, and clean lenses with a soft cloth to remove smudges. If problems persist, consult the user manual or seek professional help rather than forcing parts.
Can the microscope be used for educational purposes beyond STEM?
Yes — the handheld microscope is useful across the curriculum. In art classes it reveals textures and patterns; in history it can help examine small details on artifacts; and for language development it gives material for descriptive writing. Integrating the microscope into different subjects creates richer, cross-curricular learning experiences.
How can parents ensure the safety of their children while using the microscope?
Supervise children, especially those under 8, and keep small parts and batteries out of reach of very young kids. Teach gentle handling of specimens and always return live creatures to their habitat after brief observation. Set clear handling rules for the microscope and check it regularly for loose parts or damage to keep sessions safe.
What types of specimens are best for beginners using the microscope?
Beginners do well with safe, easy-to-find specimens like fabric threads, sugar or salt crystals, and leaves. Indoor options such as hair or dust can be interesting too, and outdoor choices include flower petals and soil. Starting with familiar materials helps children build confidence before moving to more complex samples.
How can parents track their child's progress and learning with the microscope?
Keep a simple observation journal where the child records date, specimen, magnification and a few key observations. This habit reinforces learning and develops writing and analysis skills. Share the logs or photos with teachers to show progress and support classroom learning. Regular conversations about observations help deepen understanding and retention.
Conclusion
Using a 60X–120X handheld pocket microscope opens up a world of discovery for children, sharpening observation and inquiry skills through hands-on, engaging activities. The device aligns well with the Australian Curriculum and helps nurture curiosity and critical thinking. With a few simple experiments and consistent routines, parents can support their child’s science learning at home. Ready to inspire your child’s next discovery? Start exploring our range of pocket microscopes today and make learning a daily adventure.